Why Root? Two reasons. The first is that you can run certain apps that require root to offer full functionality. A good example of this is Avast! Mobile Security, which requires root for half of it’s security features to work. The second reason to root, is that you can install the Google Play market and get all of your content from there onto your Kindle. This includes other Google Apps as well, such as Gmail and Talk. Prerequisites:
ADB (USB Debugging) Enabled on the Kindle Fire HDThe computer must be set up with the Kindle Fire usb drivers to connect to the deviceThe Kindle Fire HD connected to the computer via USB cordDownload QemuRootDownload Root_with_Restore
These root tools were created by Bin4ry and sparkym3 of XDA-developers. If you find them useful you may want to thank them! Before we get begin, make sure the Kindle Fire HD is plugged into the USB cable connected to your PC.
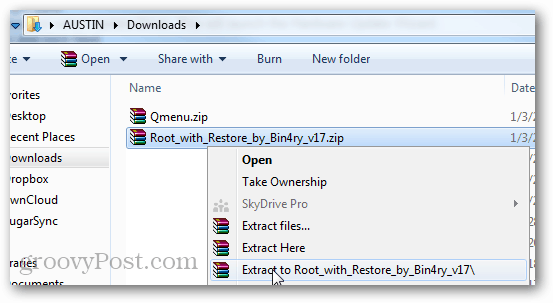
To get started you need to extract both the QemuRoot and Root_with_Restore zipped archives to anywhere on your computer that you please.
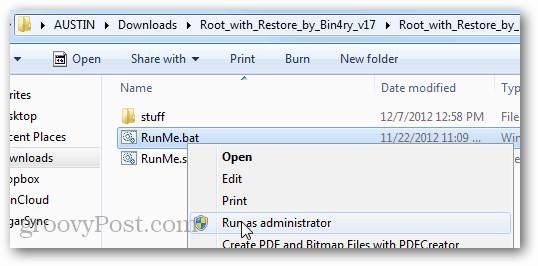
From the Root_with_Restore package open RunMe.bat as an administrator.
Note: If the Kindle Fire is not showing up you may need to open up Task Manager (Windows Hotkey: Ctrl+Shift+Esc) and End Process on adb.exe.
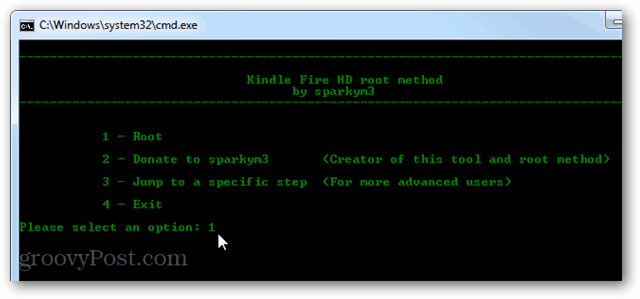
In the green command prompt window that appears type in 1 and then press enter.
Now jump over the Kindle Fire. The screen should change and show a restoration page. Tap the “Restore my data” option. The Kindle Fire HD will now need to reboot twice.
After two reboots the Kindle Fire HD should look normal again, and the Root_with_Restore command window should say all is done, press any key to continue. Go head and press a key or close it. Next we need to run QemuRoot.
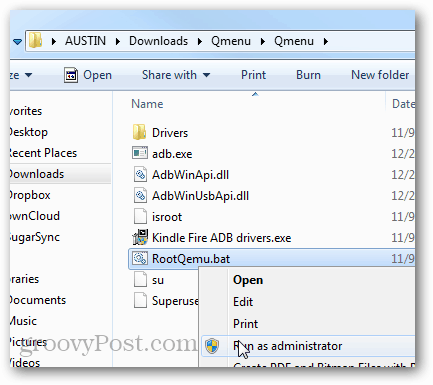
Within the extracted folder run RootQemu.bat as an administrator.
A prompt should open up. To start the Root press 1 and then hit Enter on your keyboard.
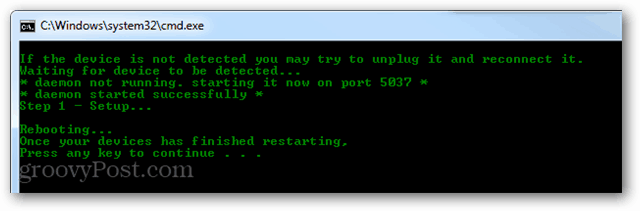
The first 2 screens will ask you to make sure you installed the ADB driver and whatnot, you should be able to just skip past them. The third screen will reboot the Kindle Fire, this is Step 1. Step 1 will take about 30 seconds to finish, then you must wait for your Kindle to reboot. After it’s done rebooting, press any key on the keyboard to continue. Note: Avoid pressing anything early as it will just cause it to take longer.
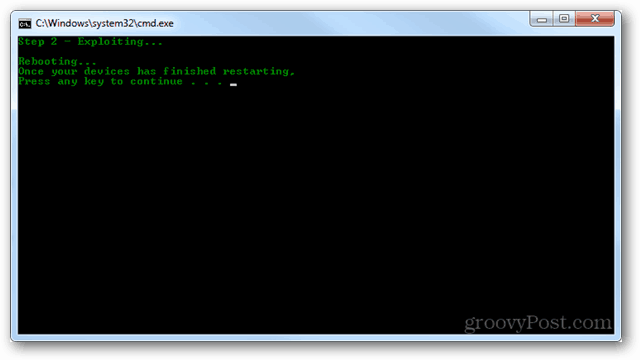
Step 2 will be the same thing, once it’s done just wait for the tablet to completely reboot before you touch anything.
Carry on, the tablet has to reboot several times while this is being set up. Just be patient, I know waiting through something like this can be difficult because you want to use the shiny new tablet, but waiting is all we can do at this point.
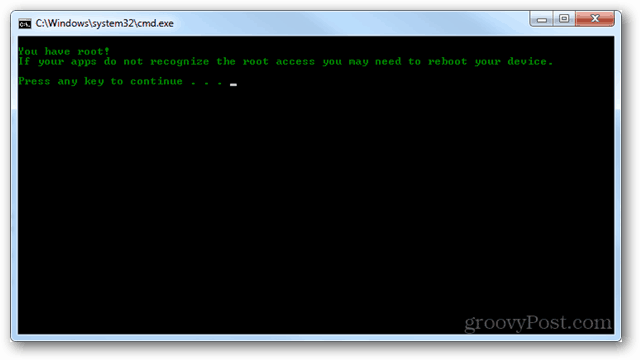
After step 4 the script will finish installation completely and alert you that “You have root!” That’s it, done, capiche?
You can also double check that the root went through by checking for the rooted app “Superuser” in the app device app drawer. If it’s there, that means the root was successful. You’ll need to manually open the SuperUser app at least once before other apps can begin pulling requests from it.
Now your Kindle Fire is rooted! Have fun using rooted apps, and stay tuned for our guide on how to install the Google Play market on the Fire HD. If you’re not familiar with “rooting,” you may be familiar with “jailbreaking” on iOS. The two are very similar. On a Windows PC it is similar to running a “limited” account vs. running an “administrator” account. Without the comparison, when you root the Kindle Fire HD it gives you administrator access to the entire device. Before a root, the device is somewhat locked down and you don’t have access to the file system. After a root you can access and change every part of the device. This allows you to create heavy duty backups that can save the entire operating system. It also allows for overclocking and other advanced utilities to function that normally couldn’t. Thanks again for the question, and thanks for reading groovyPost! I don’t believe that it voids the warranty. A quick look through the warranty information provided on these pages makes no mention of software manipulation or rooting. So it’s probably still fine. – http://www.amazon.com/gp/help/customer/display.html/?nodeId=200782640 – http://www.amazon.com/gp/help/customer/display.html/?&nodeId=200506200 – http://www.amazon.com/kindlewarranty theoretically shouldn’t any problem with rooting the Kindle. Still, if you’re paranoid you can always unroot the device by returning it. So far the Kindle is automatically unrooted everytime there is a system update. There isn’t an easy method to manually unroot but we’re in the works of figuring it out. Thnx for visiting the blog! The cause behind this problem is a feature that is normally quite useful in Windows. Whenever you connect a new device to your computer Windows automatically searches for built-in drivers that will work with it. If none can be found, it may even search online for a driver that matches it. I think it’s odd you are running into this problem though. Are you running the executable? And does the Kindle Fire HD have ADB enabled? system/bin/sh:cannot create/data/local.prop:permision denied it then says root failed. is this due to me having the latest kindle fire hd. I’ve tried to root but after the 1st reboot of the kindle i keep getting permission denied. on step 2!?!?!?!? PLEASE ASSIT I have 7.2.3 rebooting… once your devices has finished restarting. press any key to continue . . . i press any key once its done and the program just closes i cant get any further please help Sorry to whine, but I am out of options and above my pay grade. Help! Thanks…(hopefully?) I’m going round in circles… any help would be much appreciated. Thank you :) I’m sorry, but when it’s time for the 3rd or 4th step, it seems to say fail all the time? What did I do wrong? Step 3 – Checking for access… The system can not find the file specified. What am i doing wrong here? Step 2: Exploiting – system/bin/sh: Can’t create data/local.prop: permission denied i have tried it four more times and i get the same error each time. Comment Name * Email *
Δ Save my name and email and send me emails as new comments are made to this post.


![]()
